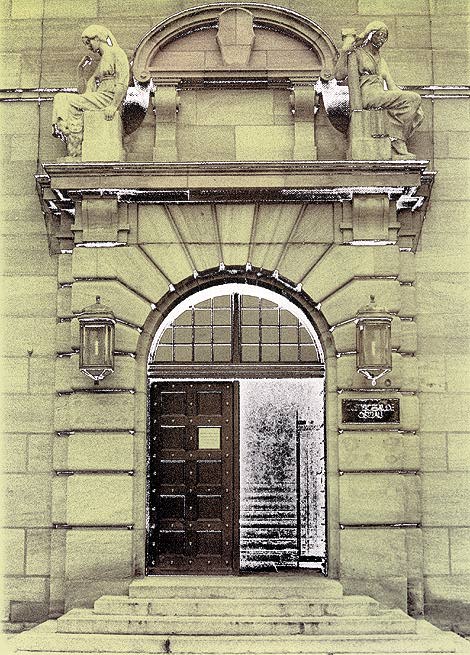

The process in question is bleach-etch, which is traditionally used for making coloured display artwork from high contrast b&w prints on pre-coloured paper such as Kentint, from Kentmere (UK manufacturer), or Autone (once produced by the now-defunct Guilleminot factory in France). The images are often lettering, but may also be line drawings. Pictorial subjects are not normally thought suitable, though the purpose of this report is to show that this belief is not entirely true.
Bleach-etch processes work by bleaching the black silver parts of a print and simultaneously etching away the gelatin in those same areas; the by-product of the bleach either removes the emulsion itself, or makes it soft enough to be wiped off in a water-bath.
If the technique is used on tinted papers, the results can be seen directly as white areas (in place of black) against a coloured background. If conventional papers are used, the bleach-etch process makes the image almost disappear - because the image is now white against a white background.
When the (resin-coated) paper is swabbed with dye, areas that are unetched and thus still covered with gelatin absorb the colour whereas those that have been etched do not, once again revealing the image as white out of colour. Despite being slightly more involved, this method is betterfor creative work than using coloured emulsions because it offers greater flexibility. All stages of the process normally run to completion, making bleach-etch an all or nothing affair: there is no room for greyness in a traditional bleach-etch image.
Image shot on 35mm Fuji Neopan 400, developed in hot E-6 first developer and printed on oyster-finish Sterling RC VC Pro paper. Bleach-etched for 2.5 minutes, then tinted with diluted Fotospeed leaf green dye.
Some users report difficulty with prints that have been fixed in ammonium thiosulphate formulae which include hardener, though I encountered no problems with Ilford Hypam, which does not. Dyes suitable for colouring bleach-etched prints can be any photographic liquids, including those offered by Photocolor (Photo Technology) and Fotospeed.
The basic routine is to prepare a suitable print as normal, then to immerse it in the bleach-etch solution, followed by rubbing with a cotton-wool pad to remove the loosened gelatin. After a brief wash in warm water prints can be dyed by swabbing with colourants. In theory, prints should be of high contrast, with dense blacks and clean whites. However, for pictorial applications it is perfectly possible to use prints that contain shades of grey - provided that the image is sufficiently grainy to allow the emulsion to be bleached and etched in individual areas.
To take the first case first: suitable high contrast (soot and whitewash) prints can only be obtained by printing from high contrast negatives. In fact, because bleach-etch is a reversal process, you might prefer to start with a high contrast positive. Such originals can be created by using Agfa Scala rated at EI 400 and push processed two stops. This may seem wrong - giving more push processing than the under-exposure demands - but it results in cleaner images that are more appropriate to the bleach-etch process. Conventional negative images can be shot on Agfa Ortho, Kodak Technical Pan, or other slow-speed films given suitable development. Printing is best done at Grade 3.5: hard enough to ensure good whites and blacks, but not so hard as to require additional exposure when using slot-in variable contrast filters.
Agfa Ortho film printed onto Sterling RC VC Pro, bleach-etched and dyed to completion and swabbed free-hand to give a surreal coloured effect
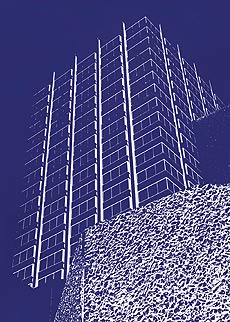
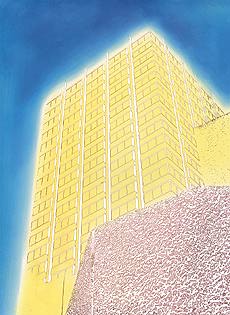
Bleach-etch processing is as described, resulting in images such as the deep blue office block example shown here. If bleach-etching is cut short after about three minutes (full processing takes about five minutes), some of the black in the print will still remain. This, together with multiple colourings, can be used to give particularly surreal results. The alternative office block print was created in this way, with colours swabbed free-hand. If hard-edges had been required, liquid masking could have been painted onto the print to isolate separate areas.
One way to get sharp grain is to use an appropriate film - notably, Kodak T-Max P3200 rated at EI 1600 but processed as if for EI 3200 (the same exposure/processing mismatch as was suggested for Agfa Scala). A more interesting alternative is to take a modest but tightly grained film and process it to boost the grain size. Fuji Neopan 400 works very well. The trick, announced to the world at large by Melvin Davies of Master Mono some years ago, is to develop b&w film in the first developer of an E-6 kit.
Compared to conventional b&w developers, the first developer of E-6 is used at higher temperatures and with shorter processing times. For Fuji Neopan 400 (rated at EI400), 4 minutes at 24 degrees C gives sharp images with near-normal grain. Upping the temperature to 34 degrees C and dropping the time to 3 minutes gives a more gritty look with some edge effects around very dense areas. Slight chemical fogging can occur, but not enough to be a problem. Reticulation can also occur if care is not taken over temperature control: usually this is to be avoided, but sometimes it can actually enhance the image. Obviously, this technique works best with the right subjects - portraits are generally out, but architecture tends to work very well.
Bleach-etching is done by trial and error, taking test prints from the bath at noted times. Unlike the high contrast case, it is not possible to watch and wait for the gelatin to bubble and loosen as the tray is rocked. Times of around two to three minutes, tested at 15s intervals, seem to work best.
Similarly, whereas fully bleach-etched prints look good when dyed with bold colours, part-etched images are better suited to more pastel colours. Since remaining areas of black and grey are turned brown, complimentary blues and greens are good choices. More subtle colours are obtained by diluting dyes about 1+10 with water before swabbing, but still swabbing until the gelatin is fully saturated with liquid. Further experiments are left to interested readers.
Many of the items mentioned here (CJ Products Bleach-Etch Solutions, Sterling RC VC Pro, Fotodyes, Liquid Mask and E6 First Developer) are available from Fotospeed in the United Kingdom. In addition, Fotospeed has limited copies of Cyril Jordan's Etch-Bleach and Dye Process Manual. This 28-page booklet normally sells for �5 GB pounds, but is available to Photon readers at a special offer price of �3 (please send extra for overseas postage). To order materials or the booklet, contact Fotospeed at Fiveways House, Westwells Road, Rudloe, Corsham, Wilts SN13 9RG, UK. Tel: (+44) 1225 810596.
For more information about processing b&w films in E-6 first developer, contact Melvin Davies at Master Mono on (+44) 171 336 7962.
All photographs and printwork by Jon Tarrant.
E-mail the author Jon Tarrant
Return to September contents