
Although it sounds original, the idea is not unique. In the reprographic printing industry, for example, Fuji's graphic arts division offers a photo-polymer plate system that is written (exposed) using an argon laser and saves having to make intermediate negatives for conventional photographic plates. As an aside, this is an important development because the reprographic printing industry is currently a big user of b&w materials, and if this market shrinks it will almost certainly affect the photographic market too. Fuji�s photo-polymer reprographic plate, like its Pictrostat system and like Heliochrome too, develops in plain water.
The Heliochrome kit was unveiled at Focus on Imaging 95 and is now distributed by Film Plus in West London. Visitors to Focus may recall that the kit was demonstrated on the Fotospeed/Sterling Imaging stand, and indeed Sterling's John Herlinger was another of the people who encouraged and helped Dr Perera towards production of the kit. The final form of the kit is best described as something for the enthusiast who prefers to discover things first hand rather than to be given hard and fast specific rules that are explained in minute detail. Unfortunately, this process of discovery can be as frustrating as it can be rewarding.
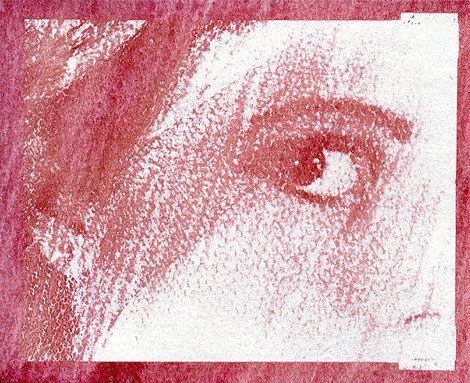
A Heliochrome print made from a single exposure on a magenta-dyed coating, from an original photograph by Anouska Fowler, printed by Jon Tarrant
This said, the kit is remarkably easy to use. Activator B, which is supplied as a yellow-brown powder in a small black plastic bottle, is dissolved in water by filling its container directly from the tap. The solution is then poured into a larger black plastic bottle that is part filled with Activator A (a thick white liquid). The mixture is shaken and can be stored for 8-10 weeks in, according to the instruction booklet, 'a domestic fridge'. I strongly suggest that this would be a very bad idea where children have access to the fridge since, as has already been noted, there are no warnings of any sort printed on the kit's bottles (even if there were, this would still be a bad idea!).
Also included in the kit are two large white plastic bottles containing Seal Coat A and B, which are used separately, and a set of six color dyes. It is worth noting that Seal Coat A is the only bottle to be foil sealed (probably linked to the fact that it smells as if it contains a volatile alcohol). All these items will keep for long periods of time without refrigeration.
To coat papers for printing, a piece of cardboard is cut to make a spreading tool that is used to apply the two seal coats in turn (allowing the paper to dry between applications). A small volume of Activator mixture is then diluted 1:1 with water and the desired dye is added. Application can be done using a brush, roller, glass rod or by any other means devised. Printing is done once the paper is dry and is a contact process that, according to the instructions, requires UV light. Development is in water. Multiple coatings can be used to build-up density or different colors, though obviously a method of registration must be used in such cases. After all printing is complete, the image is fixed by giving an overall UV exposure without any negative in place.
Despite what is said in the Heliochrome instruction booklet, you do not need a UV light to use the process. As I have also discovered of other alternative processes, Heliochromes can be printed very successfully using a 2000W Photon Beard blonde studio light. With such a light placed about two feet away from the target, cyanotypes are exposed in about twelve to fifteen minutes, whereas Heliochromes take just one or two minutes (Jon - a fried egg only takes two minutes under a 2000W Blonde at 2ft! - Ed). Both these times refer to my own method of negative preparation (see below). The Heliochrome process is clearly much quicker to use than other systems, though times vary slightly depending on which dye colors are used.
Perhaps the biggest hurdle faced by people wanting to try out alternative processes is the requirement for large negatives whenever contact printing is involved.
There are four solutions to this problem. The first, and easiest, is to shoot on five-four (or larger) in the first place. This is what I often do, rating the film either at its standard speed or one stop faster (depending on the subject) and pushing development by about 50 per cent. By doing this, a gutsy negative is produced, which, in normal terms, would probably print on Grade 0.
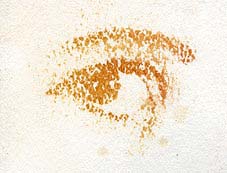
Eye detail from a print made with mixed yellow and magenta dyes, given the same exposure as the magenta print above, but showing significantly less density
The second option is to shoot on 35mm or whatever, then to make a print and copy this on to five-four yourself. Owing to the contrasts of the print and film, push processing may not be needed in this case.
If you don�t have a large format camera, the third option is to take your print to a photographic laboratory and to order a copy negative. One of the best prices for this service is that charged by Sky in central London (+44 171 434 2266), where 10 x 8" b&w negatives made from either prints or color transparencies cost �11.45 ($17) each. Ideally you should discuss your exact requirements with the lab rather than just dropping off a print and hoping to get the right sort of negative as if by magic. Should none of these options appeal, the final solution is to make your own enlarged negative. This offers greatest control, but does require a bit of practice. As it happens, Film Plus has just started stocking Heliochrome Direct Duplicating Film, using which it is possible to make enlarged negatives in a single step.
Returning to the Heliochrome kit itself, and summing up my tests of it, I have to say that it has proved very difficult to master. Much of the reason for this lies in the poor instruction booklet, which I am told is being expanded to include more specific details. My other frustration was in the number of coatings required, though Dr Perera tells me that if plastic-coated art paper is used (such as Poly-Art, available from printers' paper supplier Robert Horne in the UK, tel +44 1604 495333) it is not necessary to seal coat at all.
I have not tried this out but if successful it would speed working and remove the need for two of the chemicals involved, so reducing costs. Given that the complete kit is priced at �41.12, while the activator and dye set bought separately cost �11.16 and �14.69 respectively, plastic-coated art papers might well be the best way to start. Of course, plastic papers don't feel the same as watercolor papers, but you pay your money and you take your pick.
For details of free Heliochrome demonstrations to be given in Britain by Dr Perera, and also of one-to-one tuition classes, call Film Plus on (+44) 171 727 1111.