"Leaves are green and certainly not red!", a friend once told me on seeing a selection of my transparencies.
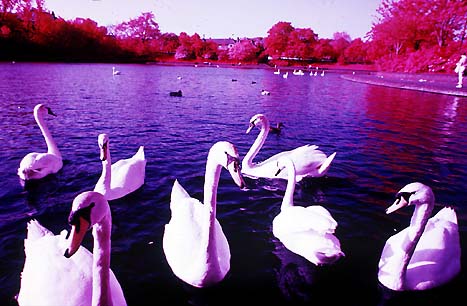
What he was seeing were the results not from computer manipulation but by shooting straight. What made the images different was a special film. The film which is capable of producing surreal splashes of colour is Kodak Infrared Aero Ektachrome film, with the use of coloured filters.
The 35mm version is sold both to medical personnel for mapping venous patterns, and to photographers for pictorial effects.
The film was originally developed by Eastman Kodak for the US Military as a camouflage detection film around the second World War. It is available only in 36 exposures and the cassette does not have DX coding, so the film speed has to be set manually on your camera. If the camera cannot be set manually, a DX Coder (adhesive label available from mail-order suppliers like Firstcall) can be fitted to the cassette. Ektachrome Infrared colour film has an equivalent film speed of 100 ISO and can be loaded into a camera in normal conditions but away from direct sunshine. This is in contrast to Kodak's black and white High Speed Infrared film which must be loaded in complete darkness because of its propensity to pipe light through its special base. Because of its origins, the Ektachrome film can only be developed in the old E-4 processing solutions.
What makes colour infrared different from other reversal films? Normal panchromatic and conventional colour photographic films are sensitive to all colours of light, even extending to the ultraviolet region (which is not visible to humans). Different colours of light correspond to different wavelengths which are measured in nanometres. One nanometre (nm) is equivalent to one hundred millionth of a metre. Most black and white panchromatic film is sensitive between 250 to 690nm. The limited recording of the short wavelength ultraviolet is due to poor UV transmission of glass camera optics and the gelatin base of photographic emulsions. To record UV fully, you need special fluorite lenses. In practice we try to eliminate UV influence in photographs by using a UV filter, as it can cause low contrast and loss of detail due to haze.
JPEG diagram of electromagnetic spectrum
At the other end of the spectrum are the long wavelengths of far red and infrared, meaning "below red". Ektachrome Infrared film is capable of recording wavelengths between 700nm and 900nm which cannot seen by the human eye. Sensitising any film above 900nm would be impractical because heat at approximately body temperature would then fog the film.
Ektachrome Infrared records light both in the visible spectrum and the IR region, unlike normal film. The film is not designed to be used in low light or night-time conditions, but by illumination of daylight quality.
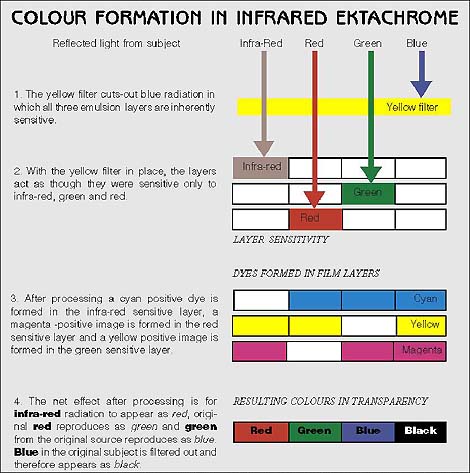
How are the unusual colours achieved? Most colour films have three emulsion layers which are sensitive to blue, green and red wavelengths of light. Ektachrome Infrared�s three layers are sensitive to IR, red and green light when a yellow filter is placed in front of the lens. The yellow filter cuts blue light which might otherwise record on all of the layers.
JPEG diagram of film layer response (large diagram file)
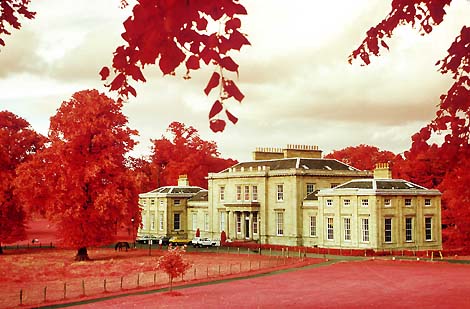
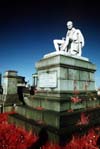
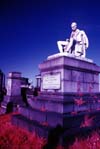
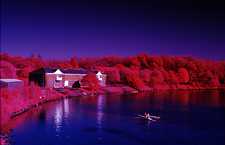
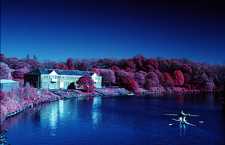
The final results give false colours. They do not represent how you might see the world if you could see infrared radiation. White objects reflect all the colours of the spectrum and appear as white on film. Foliage reflects infra-red radiation (producing red) together with green (producing blue) making the final image appear as magenta. Some types of stone appear in quite natural colours. So a scene with a building and surrounding foliage can give an effect of unnaturally coloured foliage while the building still appears normal.
Another property of the film is its ability to reduce haze in distant views. This is due to the fact the long wavelength of infrared radiation is not easily scattered by the earth�s atmosphere.
A green filter and polarizer combined
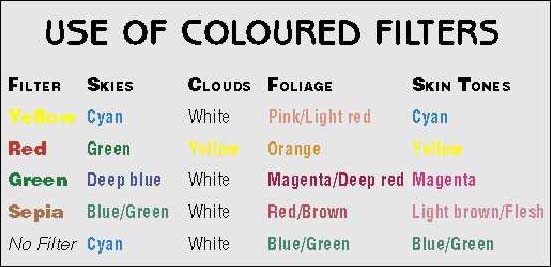
The effects are not limited to only using a yellow filter. Changing to another filter such as green produces an entirely different effect. The table below gives an indication of what to expect when different filters are used. In addition to the filters listed, a polariser may reduce contrast and enhance colour saturation. With a coloured filter, exposure times will inevitably increase. Below is a table to give an indication of the effects that may be achieved using various coloured filters.
As the film records both visible and infrared radiation, the camera lens should be focused as normal and not using the infra-red focusing index (present on most professional SLR system lenses) which is calibrated for black and white infrared film.
To ensure that all the wavelengths are focused it is best to use the smallest possible aperture, no wider than f8. The best lighting conditions for this film are when the sun is relatively close to the horizon, and contrast is low. If the sun is high it will result in too much contrast which will bleach the highlights of the final image, and shadows will not fare much better as they become blocked up. With filters and a small aperture, the use of a tripod is strongly advised to prevent camera shake, even in bright conditions because the amount of light reaching the film is dramatically reduced.
Above: left, with a sepia filter and polarizer; right, with a green filter and polarizer
Above: left, with a green filter and polarizer; right, with a yellow filter and polarizer
Exposures longer than 1/15th of a second will lead to reciprocity failure. The images will tend to be underexposed by at least one stop, so an increase in exposure is required.
Infrared materials are high in contrast by nature, meaning that exposure latitude is limited to half a stop either way. Bracketing is always recommended, if not essential. A lot of film may have to be wasted just to get the right exposure. It is advisable to take a note of lighting conditions and exposures for future reference. It may be boring but it will save you burning a financial hole in your pocket. TTL light meters are not designed to read infrared and therefore this adds another reason for bracketing.
Since the film was developed decades ago, it is by modern standards fairly grainy. In scientific terms it has a RMS granularity of 17 (compared to Panther 50 which a RMS granularity of 9 - measured at a gross diffuse density of 1.0, 48 micrometer aperture, 12x magnification).
Storage of the film in high temperatures or high humidity may change the performance of the film, risking a loss of sensitivity and an increase in fogging. The recommendation by Kodak is to store colour infrared film in a freezer at -18 degrees C to -23C (0F to -10F) in the original sealed package. Unfortunately, in many cases the film is often stored by shops in a refrigerator or on a shelf.
In the case of removing a film from a freezer, allow 1-2 hours to acclimatise the film to room temperature before opening the package. Processed transparencies should be stored at 10C to 21C and at a relative humidity of 30 to 50 per cent.
Reversal processing can only be achieved by using E-4 chemicals. E-6 processing will damage the film and contaminate the processing chemicals, and no image will be formed. There are very few professional laboratories that are capable of E-4 processing. Listed below is one lab which does offer this service.
There are three advantages of processing in C-41 compared to E-4. Exposure latitude is broader, particularly when overexposing. The second advantage is in the neg/pos print stage. Similar to the slide, infra-red colour negatives are high in contrast. A straight forward print would show a loss in highlight and shadow detail. But the "lost" detail is still held in the negative. So by dodging and burning-in the image can be manipulated on the print to show all the details.
The third advantage is colour control. Not only can the overall colour cast be selected to your own particular taste, but also selective areas of the image may be enhanced with a different filter on the enlarger creating a more surreal atmosphere.
The best time of year to use colour-infra red film for landscapes is between May and September but there is nothing to prevent you experimenting in the studio with tungsten lighting, as this has a very high IR content, and all the colours obtained outdoors in summer can be found in tungsten-lit studio shots of similar subjects. Do not use a dichroic conversion filter as this removes much of the IR. You can also use IR heat lamps as sources of concentrated infrared light.
- John Guidi