PHOTON April 1995

In the second of his articles on alternatives to traditional
photography, Jon Tarrant devises a process for pseudo-solarisation using
Polaroid instant pos-neg films - and no darkroom or chemicals
Psolaroidation
It is tempting to think that all alternative processes are old
ones. In fact, this is true only in so far as many processes have come and
gone throughout the history of photography and all except the current norm
can be viewed as 'alternative'. The bromoil technique that I reviewed last
month is an obvious example: others will be covered in future issues. But
there are modern alternatives too. Next month I hope to report
on Dr Dunstan Pereira's Heliochrome kit, which can be regarded as a
polymer-based version of gum bichromate printing. Before that, I would
like to explain a technique of my own devising, through which it is
possible to obtain Sabattier-effect negatives without any need for darkroom
work.
The Sabattier Effect or pseudo-solarisation is often
wrongly just called 'solarisation'. Indeed, it was so by its most famous
exponent, Man Ray. But Man Ray did not discover the effect; it was first
recorded by Armand Sabattier in the mid-nineteenth century, and was
revealed to Man Ray some sixty years later through the actions of his then
assistant Lee Miller (who went on to become a highly accomplished
photographer in her own right). True solarisation involves the reversal of
local areas of a negative that have been grossly over-exposed. Typically,
this means the sun itself when included in a picture. The best known
example of solarisation is an Ansel Adams image entitled Black Sun, Owens
Valley California. In my own tests, I have, to date, been unable to
recreate this effect using modern materials.
In contrast, the
Sabattier effect does not arise by the action of any part of the exposed
scene, but rather from an additional uniform exposure given to the negative
part-way through processing. It causes originally dark areas of the scene
(light parts of the negative) to acquire a medium density and creates
strong lines between these areas and those surrounding them. Adding
density to shadow parts of the negative gives a partly reversed look to the
image, with the lines separating areas that have reversed from those that
have not.
Dish technique
Traditional Sabattier-effect images are created by developing negatives
in open trays and flashing with light some time into the process. There
are four drawbacks to this technique; it requires sheet film negatives (for
ease of handling), it must be done in a darkroom, the solution must be
completely still after flashing for the effect to become most obvious, and
it is inconvenient to re-shoot. The last of these is sometimes
countered by the suggestion that copy negatives can be used, but this is
not a good idea. The range of illumination brightness that can be shone
onto a copy negative under an enlarger is much less than that which can be
obtained in-camera. The two methods, copy-neg and original, therefore give
different results: the original being superior. Polaroid pos/neg film, on
the other hand, can be used in-camera, is very convenient and gives
excellent, though still slightly different, results.
I have
used both Type 665 and Type 55 pos/neg films (medium format and 5 x 4"
sizes). The former is cheaper and easier to use, being shot on reflex
cameras. The latter is easier to assess because its sheets have no
protective backing coat and can therefore be inspected even before
clearing. As an aside, it may be worth noting that Type 55 can be used
with Mamiya RB67 and RZ67 cameras thanks to an adaptor plate that takes a
545i Polaroid back. Obviously the image produced does not fill the entire
film area, but the adaptor, which is available in the UK through Graham
Wainwright Associates (01296 728146), does allow the use of otherwise
unavailable materials.
In order for the Sabattier effect to
work, the scene must contain areas of blackness adjoining areas of mid to
light tones. In Man Ray's work, these black areas were dark backgrounds,
with the foreground flatly lit and largely without shadows.
 My own
approach has been to combine both aspects, causing ambiguity as to what is
due to the background and what to the lighting. In the case of the torso
shown here (click the thumbnail for a full-screen JPEG, under 30Kb), the effect between the breasts is due to deep shadow, while the
surrounding area is a black background. The two appear much the same in
the final print, giving the illusion of a hole in her body.
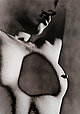
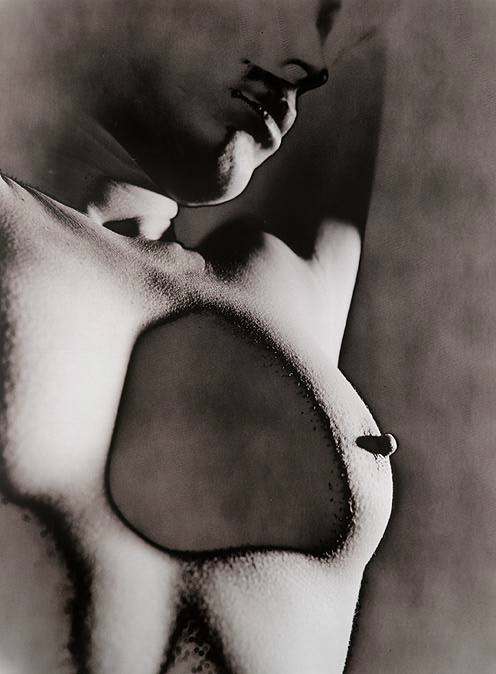
My own
approach has been to combine both aspects, causing ambiguity as to what is
due to the background and what to the lighting. In the case of the torso
shown here (click the thumbnail for a full-screen JPEG, under 30Kb), the effect between the breasts is due to deep shadow, while the
surrounding area is a black background. The two appear much the same in
the final print, giving the illusion of a hole in her body.
Instant technique
The technique for
producing Sabattier-effect Polaroid negatives is as follows. A suitable
scene, with areas of darkness and mid-tone, is set-up as required. The
correct exposure to give a fully developed, normal Polaroid negative is
determined. The exposure is then increased by about one �-stop and the
pos/neg sandwich peeled apart within 5-10s of being pulled through the
rollers. The print half, which should be almost totally white with just
slight signs of dark shadow areas, is discarded. The negative half is
re-exposed using a low power flash, then put in a dark box, cupboard, or
drawer to finish processing. After a minute, the negative is
cleared and inspected as usual. It should show white lines (which will
give black lines on subsequent prints) bounding areas between dark and
mid-tone parts of the image.
To make the re-exposure, I use a
flashgun with a full power metric guide number of 32. This is reduced to
1/16th power (equivalent to GN8) and fired at the negative from a range of
about 15". Printing is best done using relatively low grades of paper or
filtration in order to preserve the most subtle tones. Split toning can
help to enhance the effect, though Man Ray's images were always presented
in b&w.
Once mastered, Sabattier-effect Polaroids become
relatively easy to control. Even when things don't go to plan, the fact
that Polaroid negatives can be inspected so soon after shooting makes it a
simple matter to re-shoot as required. And it is this access to instant
images, not the picture quality itself, that makes the Polaroid route so
attractive. Amidst all the fuss about image transfers and emulsion lifts,
I think people sometimes lose sight of the fact that, above all else,
Polaroids are instant materials!
Quarterly newsletter
A quarterly newsletter dedicated to
alternative processes has just been launched. It is the brain-child of
Keith Dugdale and is intended to be a forum for information exchange. The
launch issue has no pictures and comprises just twelve pages, but is packed
full of useful hints and tips (including where to get details about the
Gelabrome process), with features on reversal processing and techniques for
coating plates with liquid emulsions. So, if you would like to help
further the cause of alternative processes, either learning about them or
passing-on your knowledge to others, take out a subscription to The
Alternative Photography Review. It only costs �8 for four issues. Send
cheques to Keith Dugdale at 1 Mabbotts Yard, Penzance, Cornwall TR18 2TD,
or call him on 01736 330200.
 My own
approach has been to combine both aspects, causing ambiguity as to what is
due to the background and what to the lighting. In the case of the torso
shown here (click the thumbnail for a full-screen JPEG, under 30Kb), the effect between the breasts is due to deep shadow, while the
surrounding area is a black background. The two appear much the same in
the final print, giving the illusion of a hole in her body.
My own
approach has been to combine both aspects, causing ambiguity as to what is
due to the background and what to the lighting. In the case of the torso
shown here (click the thumbnail for a full-screen JPEG, under 30Kb), the effect between the breasts is due to deep shadow, while the
surrounding area is a black background. The two appear much the same in
the final print, giving the illusion of a hole in her body.