 Click this photo pair to view a 24-bit JPEG enlarged version, which
shows the retouching effect accurately
Click this photo pair to view a 24-bit JPEG enlarged version, which
shows the retouching effect accuratelyLike most imaging software, Photoshop offers comprehensive controls for blurring. These filters are less frequently used than they should be, because many Photoshop operators are graphic artists or technicians rather than photographers, and they have not been used to the idea of de-focusing some areas of a picture to make others stand out. Instead, artists often change the contrast and brightness of the background, texturize it or vignette it, because these were airbrush and reprographic methods used in the past. Many do not work in this idiom to begin with, and treat Photoshop only as a means to create a very predictable treatment which resembles a multi-exposure or slide sandwich of blended elements. Once photographs have been subjected to this type of industry-standard layered montage, it is very hard to distinguish any personal style in the result.
Photoshop can be of far greater use to 'pure' photographers as a tool to enhance and correct pictures without turning them into manipulated work. This technique does not render a photograph invalid, any more than hand spotting, bleaching, and retouching did in the past.
Click this photo pair to view a 24-bit JPEG enlarged version, which
shows the retouching effect accurately
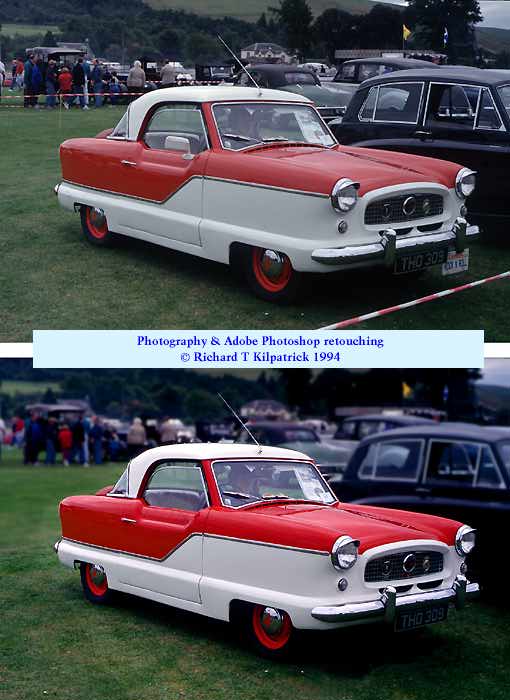
Richard Kilpatrick took the upper photograph (left) of an Austin Metropolitan at a classic car rally, using a Pentax Spotmatic, 55mm lens and Ektapress 400 film. The colours are naturally dull in the overcast light, but the fast film means plenty of depth of field. Many elements of the background scene are just too distractingly sharp, and the cordon in the foreground is very obtrusive. The car has been fitted with a modern driver's mirror, and has a label-plate under its nearside (note: RH drive!) front wing.
Scanning the negative in on the Leafscan 45 produces an accurate, neutral result (top). Using the lassoo tool, Richard selected the upper part of the image behind the car, and feathered this selection to avoid a hard boundary. Blur More and Gaussian Blur filters were tested at different settings until an effect resembling differential focus was achieved. Small details within this area were further toned down or cloned out. The car and foreground were selected by inverting the selection, and these were given an opposite treatment, Sharpen More.
The cordon, door mirror and sign label were retouched out using a soft-edged brush for cloning nearby detail. The overall contrast of the image was boosted by increasing color saturation, which always makes shadows darker. A slight blue cast in darker areas has been emphasised but was considered acceptable.
The final result is not, to the viewer, an obvious example of Photoshop manipulation. It is an effective use of the blur filters to imitate a photographic technique in conditions where that technique could not have been used. Had a wide aperture been selected, the foregorund detail would have been out of focus, and it would not have been possible to keep the entire automobile sharp while rendering the background blurred. In the newly-maturing relationship between digital retouching and photography, this kind of retouching work will be increasingly common.