Print timing zone by zone
Review by Les McLean
Richard Ross, who designed the F Stop
enlarger timer which I reviewed in this column last August, has invented
a new timer and exposure meter which uses a grey scale to allow any point
on the print to be printed to a specific density, with semi-automatic determination
of the paper grade required. The test that I carried out on the F Stop timer
had a significant effect on my own darkroom procedures in that I now use
the F Stop method of exposure when making my prints. Prior to that I had
used a one second metronome and told Richard in no uncertain terms that
I did not see any need to ever change. That I subsequently ate humble pie
and changed is testament to the quality of the product.
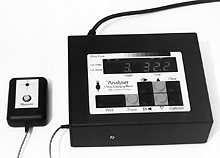
When Richard told me he had come up with the Analyser Enlarging Meter and
Timer, my first inclination was to suggest that he give it to Andy or David
to test. Once bitten, twice shy, thought McLean. However, I enjoy a challenge
so Richard sent me his prototype - and this time I was determined not to
let a box of microchips and bits of wire make me eat humble pie. The Analyser
is intended for use in black and white printing using both fixed and variable
contrast papers. It can be calibrated to suit any paper but is factory-set
for Ilford Multigrade VI.
Up to eight spot measurements can be made from the image. These readings
are then shown on an LED bar graph adjacent to a 15-step grey scale, at
this point it is possible to consider the print tones available from the
various combinations of exposure and paper contrast without actually making
a print, thus eliminating the need to make a test strip. This is done by
selecting different grades using two buttons on the front of the Analyser
to move the grade up or down. As this procedure is carried out the bar graph
display adjacent to the grey scale lights to show the tonal range of the
final print. Should a tone be outside the range of the grade be selected,
the last bar of the graph flashes to indicate this, and a more appropriate
grade can be selected. As the grades are being considered the Analyser automatically
calculates the correct exposure time to give the tones indicated on the
grey scale.
To make the print, you place the paper in the easel and press the print
button, the Analyser waits four seconds to allow vibrations to stop and
time for dodging tools to be made ready for use before switching the enlarger
on. The timer element of the Analyser works in -stops and uses 1/5th stops
for grades 0 to 3.5 and 1/10th stops for the harder grades.
IN USE
I made a number of straight prints on various papers using the factory calibration.
I found the prints made on Agfa had to be modified by 1/3rd of a stop less
in exposure time as it is a slightly faster emulsion. The ability to see
the tonal range based on the spot readings taken using the remote sensor
is very useful, yet the creative decisions are still at the discretion of
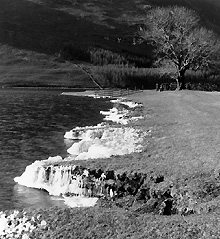
the photographer. I chose to print the Buttermere image below because I
know from having made prints in the past that a lot of manipulation is required
to produce the pre-visualised print. The grade 3 print (left) which would
be a natural choice is too weak but the grade 3.5 print recommended by the
Analyser's readings is just about right p; with the exception of the
ice on the shore of the lake which has always required burning-in to achieve
the desired tonal range, regardless of paper type or grade used.

The Analyser is supplied with a very comprehensive and easily understood
instruction booklet. Calibration procedures, together with instructions
as to how to make your own grey scale to suit your standards and materials,
are shown in a step by step guide. One real benefit in making your own grey
scale is that it will automatically take into account the drydown factor
of any paper that you test.
CONCLUSION
Clearly, no sophisticated electronic equipment can replace the judgement
of a photographer - but it can be a great help. The Analyser will not eliminate
the need to burn and dodge but it will give the photographer accurate information
on paper grades and timing with minimum effort. I see the real strength
of the Analyser being in those situations where the lighting is in the total
control of the photographer and a negative that will print as a virtually
straight print can be produced. It will be an invaluable purchase for the
studio photographer, but that is not to say that all other photographers
will not benefit from using the Analyser. I also think that a noticeable
savings in material costs will result.
Return to May 96 contents