
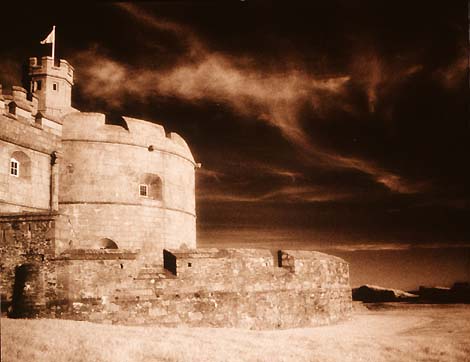
This photograph shows a good use of sepia toning by Edmond Choi, a student at Britain's Falmouth, Cornwall, College of Art. Edmond admits that he used color paper to achieve the effect, not toner... For a feature on British college courses and student work, click here
In the early days of photography sepia toning was standard practice for virtually every print a photographer made, for two reasons - firstly, the photographer's customers liked the impression of warmth that sepia toning gave, and secondly, the toned prints had a considerably longer life than untoned ones. The only problem was that sepia toning, while suiting some subjects admirably, did nothing whatsoever for others. Snowscapes and seascapes, for example, just don't look right when given the warm colors that sepia toning imparts.
For many years, sepia toning fell from favour as public taste changed and photographic paper and processing became more stable. However, we've now come almost full circle and toning is back in fashion again. Used with restraint, it can be a valuable creative tool.
As I've already mentioned, not all subjects respond well to sepia toning. The ones that do are generally subjects that have a warm character already, like sunlit cottages and texture studies of old timber and stone. Softly lit portraits can also be enhanced by sepia toning. No matter what subject you choose, the way you print it will have a major effect on the results you achieve.
Generally, fiber-based papers give better results than resin-coated papers. This is because there's more silver in FB papers, which is necessary to produce the rich blacks you get with this type of paper. And with toning, the general rule is that the more silver there is in the image the better the final result. Glossy papers give the most noticeable color change because they have a wider tonal range than non-glossy surfaces. Matt and lustre surfaces tend to diffuse the light they reflect, which gives the impression of less dense blacks. This gives a thinner, colder look to the toned image.
The traditional - and still the best - way to achieve sepia tones on prints is by converting the black silver image on your print into a silver sulphide one with a characteristic sepia color. The way you do this is very simple. First, take a print that you�ve developed, fixed and washed in the usual way and place it in a bleach bath. This converts the black silver image into an almost colorless silver bromide one. Next, remove the print from the bleach, wash it briefly, and immerse it in a bath of sodium sulphide solution. This re-develops the image to a deep brown color. Finally, wash the print thoroughly and dry it. That's all there is to it.
There is one problem, though. Not to put too fine a point on it, sodium sulphide stinks! When you put the bleached print into the sodium sulphide bath, the chemical reaction that takes place gives off hydrogen sulphide gas as a by-product. This gas has the characteristic smell of rotten eggs and is the main ingredient of schoolboy stink bombs. Fortunately, there is a way round this problem. There are several other chemicals that you can use to produce sepia tones. Although none of them give quite the purity of tone you get with sodium sulphide, they don't have the unpleasant side-effects.
The most common alternative is thiocarbamide, which is used in Fotospeed ST20 Odourless Sepia Toner (British) and Tetenal Triponal Toner (German). The process is exactly the same as with sodium sulphide, but thiocarbamide also brings with it another advantage; it enables you to control the color of the finished print, about more of which in a moment. There's also another alternative, selenium toner. Unlike both sodium sulphide and thiocarbamide, this is a direct process. In other words, you simply place the print into a selenium toning bath without first bleaching it.
Selenium toner is very versatile. You can dilute it with anything between 3 and 19 parts of water according to the degree of color change you want. The more concentrated the solution, the more pronounced the color change. It also has another use. If you dilute the concentrated solution with around 40 parts of water it will give your prints archival permanence without changing the color more than very slightly. It seems to enhance the deep shadows and take the hard edge off the untreated black image to give a lovely warm color without actually being sepia. If you've seen any Ansel Adams original prints, you'll know what I mean; this is the technique he perfected.
The working solutions of both the bleach and the toner will keep well in airtight bottles, even after they've been used. Each litre of the working solution will process thirty 10 x 8 inch prints.
Pour your solutions into two dishes and place your print in the bleach. Agitate until the black silver image has turned light buff. This will take 2 to 4 minutes and indicates that the bleaching is complete. Now wash the print in running water for about two minutes until the yellow color has disappeared. Next, place the print in the toner and agitate it well. Toning occurs rapidly and since the density of the toned image depends entirely on the density of the original image it is impossible to overcook it. Finally, wash the print well in running water - about thirty minutes for fibre-based papers or two minutes for resin-coated papers - and dry it. Natural drying is best, because heat can cause the color of the toned print to darken slightly.
Another variation is to treat the print in the toning bath before bleaching, then wash the print and give it the full treatment as usual. The tones in this case will be a black-brown and harder or more brittle in character.
Solution 1 - Bleach
Solution 2 - Toner Part A
Solution 3 - Toner Part B (Activator)
The bleach as mixed is at working strength. You can control the color of the tones by varying the proportions of Part 2 and Part 3 when you mix up the working solution. Try five parts of Part 2 and one part of Part 3 with 50 parts of water for yellowish brown tones right through to one part of Part 2 and five parts of Part 3 with 50 parts of water for rich purple browns. One part each of Part 2 and Part 3 with 50 parts of water gives a mid brown.
Fotospeed, Fiveways House, Westwells Road, Rudloe, Corsham, Wilts SN13 9RG
Tetenal Limited, 9 Meridian Village, Meridian Business Park, Leicester LE3 2WY
Silverprint, 12b Valentine Place, London SE1 8QH (for Selenium toner)