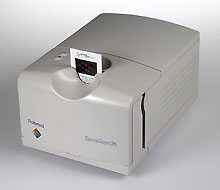
The Polaroid SprintScan 35ES
By David Kilpatrick
 In theory, a desktop scanner dedicated to 35mm slides should be easy to
manufacture. In practice, no maker has yet produced one scanner which
combines the best qualities found in specific models.
In theory, a desktop scanner dedicated to 35mm slides should be easy to
manufacture. In practice, no maker has yet produced one scanner which
combines the best qualities found in specific models.
As a brief run-down, here's the history of 35mm scanners. The first
widely-used model was devised by Siemens in Germany in 1986, jointly with
Hasselblad, and used Zeiss optics with a condensor point-source light
path. A large and heavy device, it was marketed as the Barneyscan, the
Hasselblad 35 and Dixcel, and the Linotype T35.
This model had several disadvantages - the sensor was just 2048 pixels
long, and took three sluggish passes, with dense RGB colour filters and a
heavy infra-red cut-out, to acquire a scan. It also needed regular
recalibration to prevent uneven results. The use of digital signal
processors and direct memory access inside the scanner was very advanced,
as was its ability to create downloadable film type look-up tables for any
new film which came along. But its rectangular image window meant that
portrait-format scans had to be rotated after acquiring, and it only
worked well with unmounted slides.
Its greatest disadvantage was the condensor light path, necessary to get
the high level of illumination the early CCD sensor required. This
produced very high contrast which could easily turn into blocked up
shadows, burned out highlights and emphasised grain, dust and scratches.
The Nikon 3500, rapidly followed by the 3510AF, used a sensor twice as
long but did not achieve twice the resolution, opting instead to cover a
40mm square so that landscape, portrait, Superslide and correctively
rotated originals could all be scanned straight in. A special halogen
light source using a condensor-diffuser system gave much better control of
contrast, and Nikon optics ensured good quality. Autofocus made scanning
mounted slides more reliable.
We are now approaching the 1990s, and the LeafScan LS35 arrived with the
highest resolution so far - 4,000 dpi. A discharge tube provided fairly
cool and well-balanced low contrast, high intensity light and Wratten
filters gave sequential RGB exposure. Unlike the bigger LS45, the 35 did
not have autofocus but used strip and mount carriers to locate the film
plane accurately. With a Rodenstock Apo Rodagon 1:1 75mm f4 taking lens to
ensure sharpness, it offered far more 'bit depth' and remains the first
desktop slide scanner to penetrate shadow detail properly.
The Microtek 1850S arrived at the same time at a fraction of the price of
the Nikon or Leaf. With a fluorescent lamp and lower resolution of 1850
dpi, partly as a result of covering a 36mm square instead of a 24mm strip,
it was only 8-bit and showed very little detail in dense slides. However,
it was by no means poor and could match the Hasselblad with normally
exposed originals.
The 1850S was replaced by the similar three-pass Microtek 35t, which
offered 1800 dpi interpolated to 3,600 dpi, a filmstrip capability, and
improved shadow detail. The Nikon range was expanded with the drive-bay
sized Coolscan, at a similar price to the 35t, which was very compact but
proved extremely slow - and despite its cold light source did not give any
better shadow detail.
The Kodak RFS2035, aimed at Photo-CD production labs, showed that
scanners with this kind of 8-bit quality could be made much faster. It did
in seconds what the Microtek and Coolscan took minutes to tackle. As
Photo-CD users found, it shared their inability to record concurrent
shadow and highlight detail in long range slides like Velvia or Panther.
Then, in 1994, Kodak enhanced the density range of this unit. Polaroid
announced the SprintScan 35 re-engineered from the Microtek 35 with a
higher resolution sensor and new electronics. In 1995, Nikon introduced
the Super Coolscan with a giant leap in both scanning speed and density
range - Minolta launched the QuickScan 35 which outpaced everyone but
failed in our tests to yield acceptable shadow detail from slides - Nikon
upgraded the regular Coolscan to model II - and Polaroid announced the
35ES version of the SprintScan, entirely based on a software upgrade.
When you consider there are no other significant players in this entire
market, this brief history is underpopulated in the extreme. The sheer
quantity of 35mm film shot or in existence makes it a huge market. Despite
this Canon, Umax, Epson, Fuji and others have steered well clear of it to
date.
Today, you can still buy a Hasselblad scanner or a LeafScan 35 at
surprisingly good new prices, and though Leaf's distributors believe that
no LeafScan 35 has ever been installed in the Britain (everyone buys the 5
x 4 model) I suspect this does represent the best dedicated 35mm scanning
money can buy. I say this because the slower, clumsier Leaf 5 x 4 model
outperforms all dedicated 35mm scanners for tonal range and colour
accuracy and the 35mm model is simply a very much more efficient
single-format version of it.
The Kodak scanner is also surprisingly affordable, and very fast in use.
In practice, however, most photographers will choose between Nikon
Coolscan II or Super, Polaroid SprintScan 35ES, and the Microtek 35t.
These have a street price range of around �700 (Microtek) to �1,900
(Polaroid) with the two Nikon models about equally spaced in the gap.
The SprintScan
This test deals with the SprintScan 35ES and was supposed to compare it
directly with its Microtek 35t 'parent'. Here we ran into an unexpected
problem - dealers had sold out of the 35t, or had never stocked it, or had
dropped Microtek to stock Umax or Epson instead. Distributors Computers
Unlimited didn't have one either. As we have previously used the 35t and
know it well, this was not a major concern.
Discovering that Microtek scanners were not as widely available as I had
thought was a surprise. We've used them with great results ever since they
were the first colour scanners made - from the original 300ZS onwards. As
there's no 35mm neg and slide scanner made by Umax or Epson, or coming
close to the 35t in price, it's surprising that every major computer
dealer doesn't stock this item.
Enhanced Specs
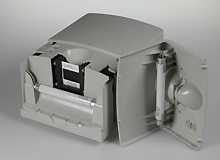 Left: removing
the neat front cover reveals not only the carrier mechanism, but a really
neat way of storing a spare flourescent lamp (supplied).
Left: removing
the neat front cover reveals not only the carrier mechanism, but a really
neat way of storing a spare flourescent lamp (supplied).
The key differences between the Microtek and Polaroid are big ones. A
higher resolution sensor scans at 2,700 dpi instead of 1,825 dpi yet still
covers a 36mm square area. Digital signal processor, accelerated SCSI,
large memory buffer, firmware with built-in look up tables for 10-bit A to
D conversion - all this stuff is technical, but basically it adds up to a
scanner which can cope with a greater variety of film types and exposure
densities, and scan faster.
Our task was to see whether early problems with the Polaroid, which could
produce unpleasant colours too readily, had been solved with the new
software release.
The software is comprehensive and excellently written as Photoshop
plug-ins go. A large preview window is accompanied by a small, separate
control window. Reasonably logical and intuitive entry boxes to set
percentage magnification or final image size and resolution work almost
the same way a designer does, while pull-down menus hide a wealth of
additional controls.
The preview is in live colour. If you make adjustments - with the white,
black or neutral point tools to over-ride auto density and colour balance
setting - you see them on screen before scanning. You can even see the
effect of changing from one film type to another (say from 'Fujichrome'
to 'Pro Fujichrome') unless the difference is too great, in which case you
need to do a new pre-scan.
Even sharpening, which includes a very useful setting for smoothing out
grain and dust but sharpening edge contrast, is visible in the preview
window and handled on the fly during scanning. It is also fully
adjustable, just like Photoshop unsharp masking.
In fact, the main Photoshop post-processing controls - gamma, levels,
colour saturation, sharpening or softening, exposure, white point, black
point, neutral balance - are all available in the plug-in for real-time
application as the scan is acquired. Nor does their use appear to slow
down the process, with a full page cover pictures typically being grabbed
in around 90 seconds. Most scans seem to take around 30 seconds to preview
including 'getting started' time, a few seconds to adjust and crop or
scale, then as little as 15 seconds to scan plus the same to save.
Unless dust or scratches need removing, these ready balanced and
sharpened scans can be saved and placed for printing without any Photoshop
work. It would be reasonable to assume a productivity of around 30 scans
an hour, and we did achieve this when tackling typical magazine pages.
The results
Despite the provision of a long list of film types in the Polaroid plug-in
menu, many are missing. There's no Velvia or Panther; no distinction is
made between Kodachrome 200 and other Kodachromes, despite its entirely
different colour and density; all Ektachromes share one generic type - and
so on.
Colour negatives (slightly easier to scan well because of their lower
density) fare much better. In practice, we found that the preconfigured
slide film types simply didn't work properly. A sheet of perfect
Kodachrome 25s would yield awful over-saturated colours with emerald
greens if set to the Kodachrome default, but perfect neutrality using the
Polaroid Chrome setting! One Fujichrome would be well rendered using the
Fujichrome default, the next would have an unpleasant colour cast and need
setting to Ektachrome, while that setting gave all Ektachromes dirty
yellow whites.
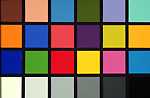
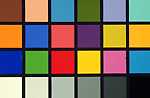
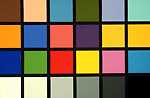
The film settings are not always ideal: top left; the Ektachrome
setting with Ektachrome 64, top right, with Ektachrome 50 (amatuer);
center left, with Ektachrome 200; center right, with Panther 100.
Bottom
left, the Fujichrome Pro setting used with Provia 100 - right, used with
Fujichrome 400 II
The film types appear to include in their instructions to the scanner
minimum and maximum density, gamma and colour saturation variations. The
most common errors were in posterising the shadows, losing shadows to
solid black, and boosting colour saturation. Checking the pull-down menu
after an 'auto' prescan would reveal the saturation sliders all turned up
to 14, when a far superior and more natural result could be obtained with
them zeroed.
Unfortunately for this scanner, the Raw Chrome setting did not do as
expected and turn on maximum d-min to d-max range, zero saturation change,
neutral colour and neutral gamma. It yielded results showing more clipping
or colour shift than any randonly picked film type like Ektachrome.
Most worrying was that an inexperienced operator, opening slide mounts,
often found only a film type number (especially on Kodak films) and no
word saying 'Kodachrome' or whatever. The list of film types encouraged
opening plain mounts to try to find what the film was - and that's
something to be discouraged. The LeafScan needs no such action as it
treats all slides to a maximum range prescan, then sets the range
according to prescan's values.
The worst SprintScan results were very poor, with strong green or cyan
casts and excessive saturation combined with dense shadows and dirty
highlights. The best results, either fortuitously or by hard work
over-riding the scanner's decisions, were really excellent. I would class
myself after six years of scanning trannies to be reasonably expert, but I
still found some originals which I could not persuade the SprintScan to
handle well with any of its preset film types, and had trouble adjusting
manually.
Any other complaints are limited to a handful: some slide mounts did not
sit well in the spring-gripping carrier slot, and ended up a degree or so
off square; the scanner is fixed focus and tended to be sharper at the top
of the slide than the bottom on full page scans; and when switched on, it
made an annoying undulating hum, barely audible but ever-present.
(continues on page 42)
Finally, the 2,700 dpi maximum resolution would not manage a true 300 dpi
bleed A4 reproduction. The actual scan area is restricted by the mount or
carrier and the highest resolution I could achieve on a 303 x 213mm scan
from 35mm was 283 dpi.
My conclusion is that the SprintScan is capable of results which are
superior to the Minolta QuickScan, Nikon Super Coolscan or II, and
Microtek 35t. Its best shadow detail and contrast control outperformed all
these. Yet the very clever software, designed to ensure this benefit of
10-bit depth in the hands of the new user, consistently shot itself in the
foot.
This is exactly what the old software used to do with even greater
panache. Readers of our contemporary (rival?) The Photographer will recall
the famous 'trip to Mars' issue in which the then president of the British
Institute of Professional Photography, Gil Cox, had recorded an official
visit to China on film. Every single picture was reproduced with a
virulent green overtone and, much to Polaroid's discomfort, proudly
attributed to the use of a SprintScan.
While it could be argued that a well-adjusted computer monitor will
prevent such accidents, I find that the eye is very accommodating. Only by
direct comparison with other files was I able to spot a similar set of
scans before they went to print in our Minolta Image magazine here at
Icon - and even after that, my adjusted versions were far from perfect.
Polaroid has the best colour scientists around (OK, maybe Scitex and
Kodak would disagree!) and they really should be able to devise a better
solution. The old Hasselblad scanner method of scanning a calibration
slide including totally clear film and solid d-max is a much better route
to 10 or 12-bit accuracy. It calls for a little photographic know-how, but
if the user could just create and save named maximum range calibrations
like this for present and future films, the scanner would be proof against
mismatches.
Microtek's choice
The little Microtek 35t, despite having only 8-bit capture and hence no
chance of as much open shadow detail in theory, allows calibration using a
Kodak or Agfa test slide and special program. Personally I think this is a
waste of time. The test slides are useless - they are not real E-6 slides,
just electronic dupes made on film recorders, and they have neither the
dense black and clear white of a real slide, nor the saturation found in
live photographs.
I have tried DCR (Microtek) and Agfa FotoTune calibration using these
target slides, and invariably ended up with a parody of accuracy, colours
being exaggerated or suppressed in different parts of spectrum. Apart from
this, the Photoshop post-processing needed is tediously slow. My opinion
of ColorSync 2.0 and Kodak CMS transformations is little different.
The 35t, in fact, seems to have one advantage over the Polaroid - it can
prescan raw, unadjusted, full range scans. Their new ScanWizard plug-in is
as much an upgrade to the original 35t as the new Polaroid plug-in is to
the SprintScan. Its live preview is pitifully small, and its visible
adjustments are far from accurate - the scan never actually looks like the
preview - but it offers a whole set of on-the-fly controls similar to
Polaroid's. The key difference is that if you apply these, scan times are
slowed right down because the host computer does all the work.
SprintScan's built-in DSPs take that load instead.
Because the 35t never throws up a violent cast or contrast problem, it is
actually far safer to use. But, because it also does not accept preset
film types, its negative scans are nowhere near as good. It is in scanning
negs that these special look-up tables really start working.
The main limitation of the 35t is that it only scans up to a half-page
litho reproduction, and yields barely enough data to make a good 10 x 8
dye sub print from a neg, without interpolation. Still, it will
interpolate up to 3,650 dpi, which makes it able to produce a 300 dpi full
bleed A4 scan - which the SprintScan can not.
Don't be deceived, however. The SprintScan at 2,700 dpi is much sharper -
down to grain level. There is little real point in letting the Microtek
interpolate data, as a clean scan at maximum optical resolution will look
just as good and print faster.
Conclusion
If you have calibrated viewing, a colour proofing device and some
experience, I would have no hesitation in recommending the SprintScan 35ES
as the best sub-�2,000 slide and negative scanner currently available. It
is likely to be improved at little or no cost via future software
releases, especially after Polaroid's boffins read this article. It is
within their power to remove the danger of unexpected casts or exaggerated
saturation.
If you are entirely new to the field, work with uncalibrated systems and
have no way of seeing a final print without paying a lab or bureau for
output, approach the SprintScan with respect and caution. It has been
given a mind of its own, and has ended up with artificial stupidity rather
than artifical intelligence. The controls for over-riding its enthusiasm
are complex for the beginner to master.
In short, a fine bit of hardware with a plug-in that benefits from
experienced control but tempts you to leave it to its own devices.
Understand this before you buy, and you will probably never make that
unwanted trip to Mars.
-David Kilpatrick
Return to Photon July 1996 Contents