
Photon Beard 4-blade easel
Presentation is an important aspect of print making which is sometimes not
given the attention that it deserves. In the same way that the quality of
the print helps in the final assessment of the subject, the presentation
plays a part. The club and salon exhibition circuit usually looks for a
different type of presentation from that of the more traditional museum
and gallery circuit. The club scene sees changes on quite a regular
basis, whereas the traditional wide border has prevailed for many years in
the galleries and museums.
Photon Beard have made easels for many years and I would think that their
two-blade easel is a standard feature in many darkrooms around the
country. The four-blade easel, which incorporates a number of different
features, is a fairly recent addition to their range and so I took a 16 x
12 model into the little darkened room to see how it performed and whether
it made those all important subtle differences to my print presentation.
The Photon Beard 4 Blade Easel is made in four standard sizes from 16 x
12" up to 30 x 20" and is supplied with a Border Printing Kit. The easel
is fitted with four removable 2" wide blades, and a set of 4" blades are
available as an extra. The paper is located centrally into the easel and
the size of the border can be varied depending on whether the 2" or 4"
blades are used.
The model that I tested allows paper sizes from 2.5 x 2" to 16 x 12" to
be used. Each hand-made easel is constructed using high quality materials
which are in the main metal, except for the blade stops which are
plastic.
IN OPERATION
The first point that I noticed was the substantial weight of the easel
which means that there is little chance of it being easily knocked out of
position once it is in place on the base board. There is nothing more
infuriating than making and exposure and finding that when the enlarger is
switched on the easel has been accidentally moved. Having said that, the
easel is quite heavy; do not think that a hernia will result from moving
it around, but it is solid enough to be very stable when in position.
Each blade has two locking knobs and can be set accurately in place using
the measuring scale on the outside of the frame. Because the standard
paper sizes are located centrally, the measuring scales are graded from
the centre outwards on all four sides of the easel which allows for easy
and accurate calculation of the border width. Locking the blades in place
is also easy and accurate because the blade has a locking knob at each
end and once fixed it will not move. Consequently, when all four blades
have been locked into position the printed image will be square. When
using non-standard sizes, such as A4, the paper will be off centre in the
easel but because of the measuring scale on the frame it is quite easy to
calculate the desired border width.
The paper is located in the easel by placing it against two adjustable
stops which are fitted at right angles to each other in the base of the
easel. The 16 x 12 easel has 4 slots to allow for four different standard
paper sizes to be used. The frame is then closed, and the paper stops will
retract below the baseboard surface leaving the paper held in position by
the masking blades. Generally this system works well but I did experience
some problems with paper that had a pronounced upward curl, in that it
moved as the masking frame was closed and the print was then not square on
the paper. Clearly, this is not a major problem because once you realise
that this is going to happen steps can be taken to ensure that the paper
will stay in place. My own preferred method of presenting prints is to
leave a white border of not less that one inch around the image area and I
was well pleased with the ease and speed that this could be achieved with
the Photon Beard Easel. There are times when a small print is required to
be made in the centre of a large sheet of photographic paper and by using
the 4" blades, available as an extra, this can be very easily achieved.
BORDER PRINTING
The Border Printing Kit is an accessory that allows a wide range of border
effects to be made when used in conjunction with the Photon Beard 4 Blade
Easel. The kit comprises sixteen blade stops, four magnetic strips and one
border setting gauge. The most common type of border is the narrow black
line around a black and white image and a white border to the edge of the
paper but many other effects can be achieved using the kit and by
exercising a little imagination. I produced a number of different borders
and will describe how they were achieved.
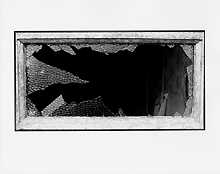
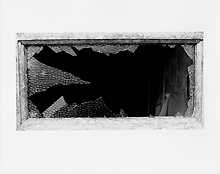
Left: An image with no keyline can fail to contain thje
eye's roving tendency.
Right: A keyline can hold the attention.
 Above; a plain
white border with black line, the simplest technique, can be tackled using
any enlarger. Above & Below left; Creating either a light grey or darker
bleed calls for very careful processing, but most of all for an enlarger
with perfectly even illumination tike the Zone IV used for these examples.
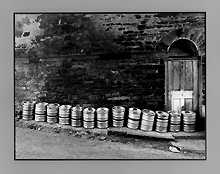
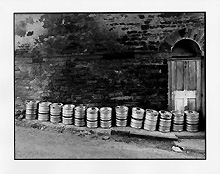
Above; a plain
white border with black line, the simplest technique, can be tackled using
any enlarger. Above & Below left; Creating either a light grey or darker
bleed calls for very careful processing, but most of all for an enlarger
with perfectly even illumination tike the Zone IV used for these examples.
Setting up the Border Kit
Eight of the blade stops are fitted on to the masking frame, one at each
end, and on the outside of each blade. The width of the black line is set
by inserting the Border Setting Gauge against the outside of the blade and
then sliding the Blade Stop against the Gauge so that all three are in
contact. Tighten the locking screw on the Blade Stop and remove the Gauge,
leaving a gap between the blade and the Blade Stop which will be the exact
width of the size of the Gauge selected.
The Border Setting Gauge consists of three strips of different thickness
and by using them separately or in combination it is possible to set
borders of 1/16th to 1/2 inch in increments of 1/16 inch. This procedure
is repeated on the other blades and the easel is set up to print a black
border of the desired width. Should more than one print be required, fit
the remaining eight Blade Stops hard up against the inside edge of each
blade to provide a return position after each print has been produced. At
this point it is necessary to cut a mask from thin card (I used off cuts
of museum mount board) to fit into the aperture in the easel through which
the paper will be exposed. Ensure that it is an accurate fit, and be sure
to mark it so that you will be able to place it into the masking frame in
the same way each time that it is used. This can all be carried out in
normal white light.
The next step is to make the print in the normal way with the paper in
place in the easel and one piece of the Magnetic Strip placed along each
long blade to ensure that the paper is firmly clamped to the base board.
Having made the exposure the pre-cut mask is placed over the exposed paper
ensuring that it is a good snug fit and the two unused magnetic strips are
laid on top of the card to hold it securely in place. Release the two
locking knobs on one blade and move the blade outwards until it sits
snugly against the Blade Stop and carefully re-lock. This procedure is
then carried out on the three remaining blades. Expose the paper to white
light, remove the magnetic strips and the card mask. Process the paper and
you should have a print with a black line around the image area with a
white border to the edge of the paper.
When exposing the paper to white light to create the black line it is
advisable to first carry out a test to determine the exact exposure
required. Underexposure will give you a grey line and too much exposure is
likely to cause bleeding under the mask, so the edge of the black line
will not be crisp and sharp. The ideal situation is to use two enlargers
so that it is not necessary to have to test for exposure time every time
that you make a print with a black line border nor will you need to take
out the negative in order to make the exposure. There are a number of
variations possible when using this technique as a starting point.
CONCLUSION
When used as a straightforward masking frame the Photon Beard Easel is
very easy to use and set to the size required, although it can take a
little longer because you have to adjust each of the four blades
individually. That comment is not meant as a criticism for it is the very
reason that the easel is so accurate and produces a good clean square edge
to the printed image.
I did, on a few occasions, move the paper after it had been located in
the easel and the frame had been closed down. This is because the paper
stops disappear below the level of the base board when the frame is closed
down and I made the mistake of touching the unexposed paper for some
reason. There are two ways to prevent this - either don't touch the paper,
or place the magnetic strip along two of the blades to clamp down the
paper.
Because of the measuring scale on the edge of the frame, accuracy down to
1mm can be achieved, which means that you should never again have a print
that is out of square. When they are matted with a white border there will
be no problems in having annoying uneven borders.
Putting black borders around the print does take a little work and
preparation. However, by building up a selection of pre-cut masks the
preparation time will eventually reduce, and again, a good professional
job can be guaranteed. In addition, and with a little imagination,
different and creative methods of print presentation can be achieved. The
Photon Beard Easel is a solid, well constructed piece of darkroom
equipment that can rightfully be described as being one of the market
leaders and will last a lifetime.
- Les McLean
Return to Photon July 96 contents