Gallery Effects even had live previews and slider controls, and the latest releases in this series are amusing and sophisticated. They remain fairly slow, in my opinion, but the non-expert user can provide some instant routes to off-the-peg effects otherwise only available through expensive programs like Painter.
The important term here is off-the-peg. If you are working for the public or for clients who are not digital image literate, the sheer scope of possible variations and the ways in which you can reach them will not be understood. You can end up making endless reworks and variations on effects once the client discovers that these are not fixed routines.
The off-the-peg effects provided by some of Kai's Power Tools, Aldus Effects, Alien Skin, Andromeda and similar packages may not have the creative integrity of 'things you make up yourself' but they are predictable, repeatable and saleable. You can show the client an example of a picture given a canvas texture or a watercolor effect, and if they like it they can ask for it. It will look much the same on their picture and they will be happy.
Here are some very quick, easy treatments of one picture.
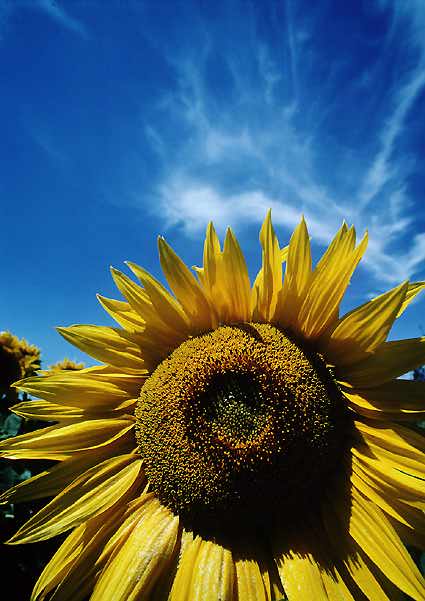
This first picture is an unmodified 17mm solo sunflower. Click this to
load up a good quality large JPEG image. If you like
sunflowers, you can get a bunch of 'em in our specimen photolibrary
browser concept.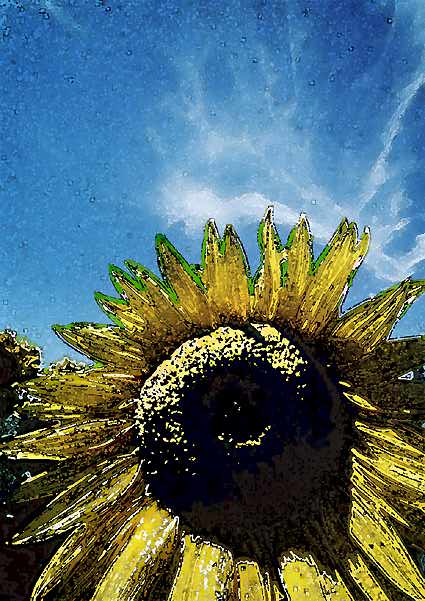 This one takes you to a JPEG showing Aldus Gallery Effects Volume 1, GE
Watercolor Effect, Level 3. It doesn't work on very dark or finely
detailed images but it's fine for portraits, animals, flowers etc.
This one takes you to a JPEG showing Aldus Gallery Effects Volume 1, GE
Watercolor Effect, Level 3. It doesn't work on very dark or finely
detailed images but it's fine for portraits, animals, flowers etc.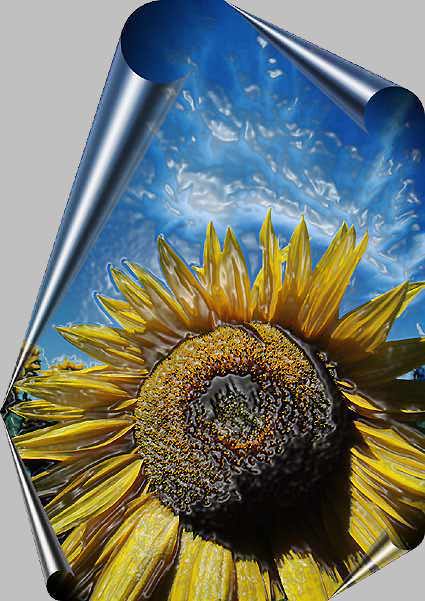 Kai can work with Aldus! This image uses two off-the-shelf, unmodified
special effect filters. The entire image was treated using Aldus Gallery
Effects Volume 3 'Plastic Wrap', which was a wonderful filter for Aldus to
have given away as a demo on many CDs, BBBs etc. It does great things
with lettering. The corners have been done using KPT's Page Curl, another
brilliantly effective plug-in which does one thing only but does it well.
Needless to say, we now show Page Curl to designers doing ads, and it's
frequently used to roll back the image and reveal a coupon, etc. If you
really want to see this pic at its best, use Netscape 1.0 or set the
background color of your browser pages to 192:192:192 RGB.
Kai can work with Aldus! This image uses two off-the-shelf, unmodified
special effect filters. The entire image was treated using Aldus Gallery
Effects Volume 3 'Plastic Wrap', which was a wonderful filter for Aldus to
have given away as a demo on many CDs, BBBs etc. It does great things
with lettering. The corners have been done using KPT's Page Curl, another
brilliantly effective plug-in which does one thing only but does it well.
Needless to say, we now show Page Curl to designers doing ads, and it's
frequently used to roll back the image and reveal a coupon, etc. If you
really want to see this pic at its best, use Netscape 1.0 or set the
background color of your browser pages to 192:192:192 RGB.
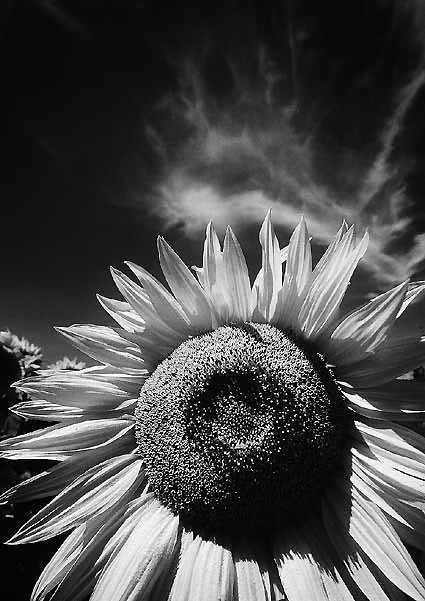 Anyway, click this thumbnail to get a big mono JPEG showing how copying
from an RGB color file's RED channel gives the same effect as shooting
panchromatic film thru an 8X red filter. When you convert color images to
mono, consider whether you would have used a filter in the situation. Try
Red and Green channels blended for an effect similar to a 2.5X
yellow-green. The Green channel alone can be useful for studio portraits
(a 3X green filter used to be standard recommendation for tungsten studio
portraits on panchromatic film, as it deepens lip color and enhances skin
detail).
Anyway, click this thumbnail to get a big mono JPEG showing how copying
from an RGB color file's RED channel gives the same effect as shooting
panchromatic film thru an 8X red filter. When you convert color images to
mono, consider whether you would have used a filter in the situation. Try
Red and Green channels blended for an effect similar to a 2.5X
yellow-green. The Green channel alone can be useful for studio portraits
(a 3X green filter used to be standard recommendation for tungsten studio
portraits on panchromatic film, as it deepens lip color and enhances skin
detail).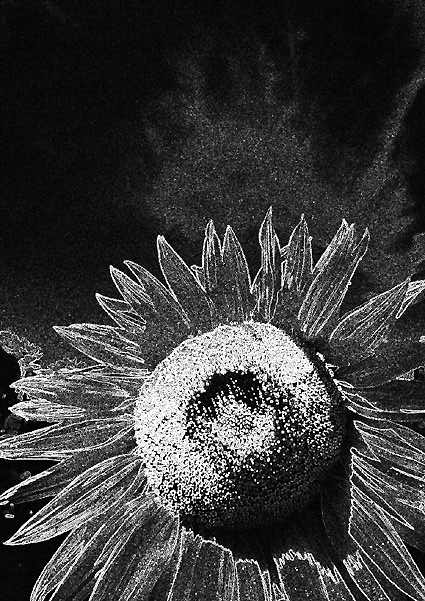 This final example is based on the red-filter conversion. It is an
imitation of a grain-enhanced pseudosolarization, the kind of thing you
can do in the darkroom using a 35mm neg, a contact frame and Kodalith
film. Two KPT filters were used - first, Find Edges, then Hue Protected
Noise - Maximum. The standard Photoshop equivalents will do just as well.
Finally, Sharpen More was applied to boost the graininess, then Sharpn
Edges to enhance the fake sabbatier effect without changing the graininess.
This final example is based on the red-filter conversion. It is an
imitation of a grain-enhanced pseudosolarization, the kind of thing you
can do in the darkroom using a 35mm neg, a contact frame and Kodalith
film. Two KPT filters were used - first, Find Edges, then Hue Protected
Noise - Maximum. The standard Photoshop equivalents will do just as well.
Finally, Sharpen More was applied to boost the graininess, then Sharpn
Edges to enhance the fake sabbatier effect without changing the graininess.Even so I guess I would prefer a real Jerry Uelsmann print on the wall rather than a 1.4 meg floppy...