A versatile format for architectural progress work - 6 x 9cm
The 6 x 9cm format p; 8-on 120 p; is one of the most useful yet
neglected rollfilm sizes. Matching the 1:1.5 ratio of the 35mm frame, it
is has over five times the image area and produces 24 x 30" prints
as sharp as a 10 x 8" is from the smaller format. Unlike 6 x 7cm, the
full 56mm width of the frame can be used for A4 reproductions.
Indeed, the new-ish 6 x 8cm format was introduced to enable this without
redesigning 6 x 7cm SLRs. Mamiya first created 6 x 8cm to take advantage
of the good lens coverage and large rotating back gate of the RZ67. They
did so because with the death of the Mamiya Press, there was no longer an
affordable 6 x 9cm hand-held camera p; the Linhof and Horseman technical
models in this size being, in fact, more expensive than most 5 x 4s.
The 6 x 9cm Mamiya rollfilm back for the Press has remained in popular
use. It was an integral part of the Plaubel ProShift 47SW wide-angle shift
camera and is used with both the Cambo and Toyo 'focus then shoot' rollfilm
backs for 5 x 4, which offer very fast operation for packshots by mounting
a focusing screen and a rollfilm holder on a rotating or sliding mechanism.
Site progress
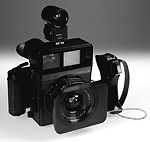
One of my first professional cameras was the Mamiya Press Super 23 with
its unrivalled 50mm 6.3 wide-angle. In the mid-1970s, my well-used old Super
23 with knob-wind rollfilm backs was an ideal tool for site progress photography.
For readers just entering the professional field, the importance of building
progress work can not be overstated, and I have written this article partly
to provide a few guidelines.
You can call it 'architectural record' work if you like, but to contractors
and photographers who actually do it, it's called site progress. I receive
at least one tender form a month for this type of work, but don't bother
with them as I'm publishing magazines and not running a studio p; I
pass them on to a neighbouring professional.
My quotation would still be around £50 including travel to spend half
a day up to my knees in mud on a bleak building site once a month. The prints,
usually 10 x 8, go out at lab prices. The chances are that I would be undercut
even on that basis.
Why?
Site progress work amounts to being paid to have a regular meeting with
a clerk of works, project manager, architect and quantity surveyor in any
combination. Your sets of prints, with your studio stamp on them, are seen
by everyone from the chairman to the agency designing brochures about the
finished building.
Site progress work pays off because unless you are very bad at it, poor
at making friends and worse at prompt delivery, you win the final architectural
work and every commission from outside contractors p; carpets, heating
installers, exterior painters, landscape gardeners, the lot. You are already
an approved supplier, you've got access to the site, and your face is known.
You have spent two years working for the barest margin, but when the job
is finished, you're the one making the giant exhibition prints or even contracting
to design and print the prospectus.
I know several very wealthy, prominent architural and industrial photographers
who built their businesses up this way. In the mid-1980s, when we were based
in Nottinghamshire, I learned that I had lost one client's regular site
progress work to a well-known studio which had priced at an actual loss
over trade lab prices. That studio went on to handle many thousands of pounds-worth
of their brochure production p; which I had never tried to quote for
p; on the back of this intro.
Enlarging 6 x 9
This brief digression apart, 6 x 9cm remains a format you will either buy
secondhand or in the form of a new Fuji rollfilm rangefinder, another ideal
site progress camera. My current kit is a near-mint, complete Mamiya Press
Super 23 outfit all in black, with a rare 120/220 auto leverwind 6 x 9 back,
Mamiya custom case, 50/100/150 lens set and all hoods. It's one of the last
made, and in this form commands a four-figure price. A tatty kit (grey,
120-only knob-wind backs or 6 x 7 versions, chrome ring lenses, 90mm, 65mm
instead of 50mm, no hoods, no grip p; etc) would probably cost around
£500 and as such represent a bargain start-up system.
The Super 23 is preferred to the later Universal because it has a Linhof-style
extending back providing rudimentary swing, tilt and close-focus capabilities.
The Universal offers Polaroid backs instead. I know which I prefer, especially
as the 50mm lens is equal to a 21mm on 35mm, and when used with the back
swung can create fantastic ultrawide views with receding plane focus from
six inches to infinity.
For many years I abandoned 6 x 9cm and worked with 6 x 7 and briefly 6
x 8cm (the excellent Fuji GX680 studio SLR). The Fujimoto 6 x 7 enlarger
was an ideal tool for the former, but with 6 x 8cm a change of enlarger
was necessary. I opted for an LPL 7540, but found the bulk and inefficient
35mm format handling of this 5 x 4 model restricting.
A 6 x 9cm enlarger was needed p; but who makes them now, excluding
some costly options from Durst? Even Elliott's GEM rollfilm enlarger is
6 x 7cm. I found two affordable colour solutions, excluding the American
Beseler and Omega models p; the Paterson Meopta Magnifax 4, and Kaiser
VCP 9006, newly-introduced in the larger format.
Both these enlargers will be covered in later tests separately, but initially
they were compared for facilities and performance. The Kaiser costs almost
twice as much as the Meopta and looks a better design with its fine-focus
control, filter drawer and below-the-lens holder for MG filters or analyser
diffuser. It also uses a hybrid diffuser-condensor system which requires
no change of mixing boxes from 35mm to 6 x 9.
In contrast the Magnifax seems ancient and clunky, with a left-handed focusing
knob and big fixed bellows rails, no filter drawer, and the need to remove
the entire dichroic head to change format specific mixing boxes which incorporate
a plastic moulded condensor surface.
The Kaiser 6 x 9cm enlarger carrier crops the negative, left, while the
Meopta despite its cruder design, allows the full area to be printed
Appearances can be deceptive. The Kaiser's 6 x 9cm is better described as
6 x 8cm, because it does not cover a full 56 x 84mm 8-on-120 negative. The
DIN standard adhered to by Kaiser and Durst is apparently 55 x 82mm for
a '6 x 9' negative and 54 x 78mm for enlarger masks p; in which case
the DIN standard is a load of cobblers, and photographers were probably
never consulted. The Meopta, in contrast, offers a carrier large enough
for cut film 65mm x 90mm frames p; capable of printing the entire width
of a rollfilm 6 x 9cm including film margins, and the entire length. It
was even able to handle System 70 dupes which are substantially larger than
6 x 9cm.
If the Meopta has a failing, it is that unlike the Kaiser which is completely
light-tight in operation, the carrier spills light all over the place, through
the negative glass stage and the adjustable mask slots. A black cloth mask
had to be dropped over the carrier and film-support arms. Both enlargers
spilled no appreciable light from their colour heads.
There is also an illumination difference between the Kaiser and Meopta
p; although the Kaiser is 50% brighter than a Durst M805 (German test
report) the Meopta is twice as bright again as the Kaiser. It also gave
more even illumination when an 80mm lens was used for 6 x 9 (the Kaiser
was only truly even with a 90mm, though it must be said this or even 105mm
is the recommended focal length, and 80mm is only intended for 6 x 6 and
6 x 7).
I prefer the Kaiser in every ergonomic and functional aspect. For anyone
using 6 x 8cm Mamiya or Fujica systems, I would recommend it highly.
But the Meopta had to be the choice for my wide-angle 6 x 9 work, despite
cursing the carrier. They would do well to remove the wobbly, out of focus
masking strips and the useless split-line rangefinder, along with the glassless
inserts which require screwdriver surgery, and make a set of simple one-per-format
plastic lightproofed carriers.
A point worth mentioning is that Meopta are shortly introducing a colour
head with built-in transformer. The Kaiser transformer came without a plug
attached and the Meopta with an unusable foreign plug. Both suppliers, on
being told of this, stated that this only applied to our test examples and
all retail sale models are fitted with correctly down-fused British 13-amp
three pin plugs.
A practical test
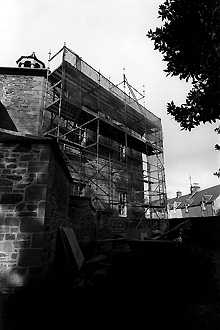
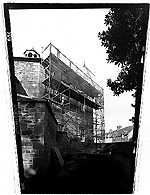
Armed with the Mamiya and 50mm, I set out to take an imaginary building
progress shot in the same kind of conditions you might encounter. Our local
historic octagonal church is being restored, and viewpoints are very restricted.
Sunshine and tree shadows create huge exposure problems. The view of the
current scaffolding could only be taken with an ultrawide lens because of
large trees close to the site.
The unmodified print (left) shows what a 'machine print' of a shot exposed
for the part-sunlit stonework looks like. The ground area is dense shadow
when the sky prints to a trace tone (G2, unfiltered, Tetenal Comfort VC
paper). To give you an idea of the speed of modern paper and the brightness
of the Meopta, the print needed only 5 seconds at 16 printed to 6 x 9"
image area.
Tilting the camera upwards has caused converging verticals, and while this
is acceptable for quick record work, it's a sure way to get yourself ignored
for final prestige shots by an architect. One look at this unmodified print,
and the photographer would be off the list for higher paid commissions.
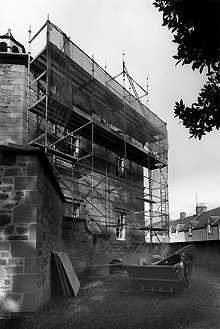
The Meopta Magnifax, fortunately, incorporates a tilting head with scale
in 15° intervals, and a swinging lens panel with similar markings.
The Kaiser offers a similar function but without markings, so recording
and repeating settings is not possible.
The keystoned print with film rebates (right) shows the effect of the required
30° of head tilt; lensboard adjustment was by trial and error and manual
focusing. The natural imbalance of light in the negative has been made even
worse, as the sky area is now enlarged more.
The final print was made using a Durst Protim set to 3 seconds exposure,
required by the ground area with the skip (in progress shots, the evidence
of a mattress dumped by a fly tipper is often as important as the work going
on).
Three further 3-second exposures were made, each with a card masking off
a further quarter of the frame, moved during the exposure to ensure an even
transition. A further 3-second shot was given to the left-hand side, two
3-second bursts to the houses in the background using a suitably cut card,
and a final extra bit to the sky.
All this was done at G2 as the FP4 Plus neg had been developed in Paterson
Acutol at 1 + 15, giving midtone compression but good highlight and shadow
detail. There is no need to use combinations of variable contrast filtration.
I used to be able to print any negative on straight graded paper, and unless
something's very odd about it I still can.
While the result is not great art or even particularly interesting, it
is architecturally correct and brings detail into areas of sunshine and
shade. The dodging only shows itself at the top of the wall between the
skip and the houses. The verticals are allowed to converge just a fraction.
Experienced architectural photographers normally under-correct by an infinitesimal
amount as this looks far more natural.
Personal control
The message behind this slightly uncategorisable article is that personal
control of printing remains important. The vertical correction and selective
print exposure techniques used here in black and white are just as viable
when using colour negative, which has a similar tonal range to FP4 Plus.
Most building progress work is now required in colour, and a good benchtop
processor for 10 x 8s is all that you need.
Hand-printing such low value work may seem uneconomic, until you remember
that progress work usually involves from three to twenty sets of each shot,
depending on the scale of the project. Most pictures will not require such
elaborate correction, and short run printing is a fairly swift and undemanding
darkroom task even in colour. It also represents the only way to show a
margin on progress work, where prints typically need to be priced at under
£2 per 10 x 8 in order to get the job p; lab machine print prices,
in short.
As to whether you, as a solo photographer, tackle this yourself and gain
a reputation for exceptional prints, or let a trainee handle it and run
the risk involved, is your decision. I can only say that when I did everything
myself, I won more and more work all the time. When it became the job of
an assistant I had trained for a long time and trusted, nothing was affected.
When it became the job of whoever was most junior the quality of output
deteriorated and clients ended up going elsewhere.
One key to my own success in this field over a period of fifteen years,
however, was insistence on the very widest angle lens for whatever format
we used. That meant the 50mm on 6 x 9cm, the 45mm for Pentax 6 x 7cm, and
later the 35mm for Mamiya 645. The use of the largest format I could justify
also helped greatly.
In this context, and architectural work generally, 6 x 9cm remains my own
favourite rollfilm format. The ideal solution might well be a Linhof with
the latest 45mm Rodenstock Apo Granda-gon and movements p; or a rare
secondhand Plaubel ProShift p; but the Super 23 stands out as a rollfilm
rangefinder of quality which any 'beginning professional' can expect to
afford. At a possible ten per cent of the price of an equivalent Mamiya
7 outfit, the difficulty of locating a good 50mm with finder is worth it.
Just watch those non-interlocked wind-on, shutter cocking, darkslide removal
and shutter release memory testers!